


CND
CND Future Form 200 PCS
Sold Out
Details
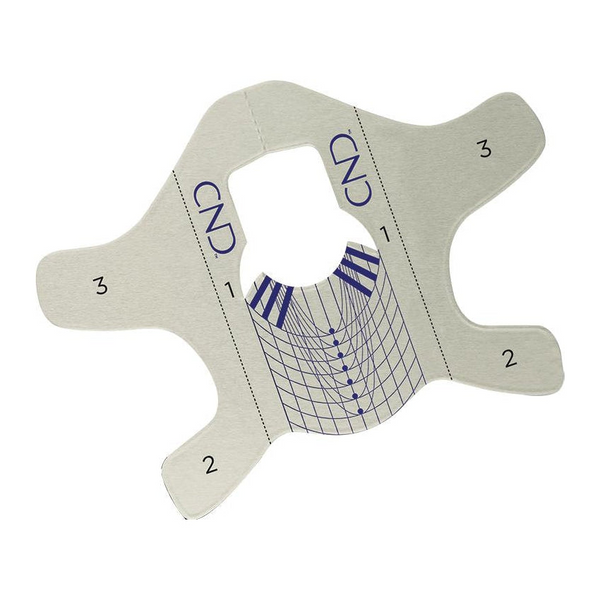
Compatible with all CND enhancement products, Future Form features an intuitive design and modernized material. Use Future Form for a customized fit with reinforced adhesion. For natural-looking nail enhancements with a deep C-curve and
no seepage. Compatible with all CNDTM enhancement systems.
Step 1 - Prepare the form
- Cut the perforated line along the back tab to allow for symmetrical placement.
- Mold the form into a gentle C-curve by holding the bottom tabs and rolling the form back and forth until the C-curve mimics the natural nail.
- Place the form under the free edge and press along the lateral sidewalls to see where the sidewall of the nail aligns with the form. To customize the form, create small indents along the sidewalls to indicate where customization should begin.
- Use cuticle scissors to pre-tailor the form. Cut the sidewall backvto the cat-ear opening. For nails with high sidewalls or a deep hyponychium, cut a V-shape into the smile line area of the form to mirror the shape of the natural nail free edge line.
Step 2 - Fit form to finger
- Place the form under the free edge, ensuring it fits snugly against the free edge line. This will help prevent product “seepage” under the nail during sculpting.
Step 3 - Secure form to finger
- Press firmly on the number 1 indicator on the form to secure the fit to the nail and finger.
- Squeeze the front tabs together and press tabs up toward the nail at the number 2 indicator to create a perfect fit, making sure the sidewall lines are straight and align to the nail.
- Further secure the form to the finger by pressing the number 3 indicator to ensure the form is secure around the finger.
Additional Details
Item Name: CND Future Form 200 PCSManufactuer: CND
Type: Nail Extensions
UPC: 639370008882
SKU: CNDM-008882
Weight: 200 grams - (0.44 lb)
Condition: New
Tags: BP-Discontinued, CND, CND Plexigel, Hard Gel, JanNE, Manicure & Pedicure, Manicure & Pedicure Tools, Nail Extensions, NovNE, Professional, Soft Gel, TIER X, Tools, Tools and Treatments, and Type: Manicure & Pedicure Tools


